
In my previous post I migrated from a Raspberry Pi home server to Google Compute Engine for the purpose of hosting Tor Hidden Service versions of my websites. This was primarily as I will temporarily not be able to run small home servers rather than due to any particular limitations of a home based setup.
In my case the main project effected by this is thehouseorgan.xyz and its onion version tho2f4fceyghjl6s.onion.
The House Organ is built with the static site generator Jekyll. I won’t be covering how to set this up or use it as there are ample tutorials. Also, the website code for The House Organ is freely available to review and reuse. Basically though, I add/modify content, run Jekyll and the site is rebuilt with the changes. It’s all very automatic and straightforward.
The way the site is published is using Gitlab’s Pages functionality. I have a git repository set up. Whenever I update the site and run Jekyll I then push the changes to Gitlab. Gitlab pages can be set-up via their instructions, it’s fairly straightforward but does have a couple of hoops to jump through. Basically it uses Continuous Integration to automagically copy the generated site files within Gitlab’s backend infrastructure to the correct place for Gitlab pages to serve the site. Once the config file and Gitlab Runner are set-up everything runs pretty smoothly.
I mention all of this because, in the previous post, getting the generated site files into the webroot folder on Google Compute Engine is quite difficult so I needed find a solution. Also, rather than manually copying files over every time the site is updated I wanted to try and automate this.
This tutorial presumes that you are using a similar site generator, git and CI. It definitely works with Jekyll and Gitlab though there will be similarities and overlaps with other setups.
Setting up Google Cloud Storage
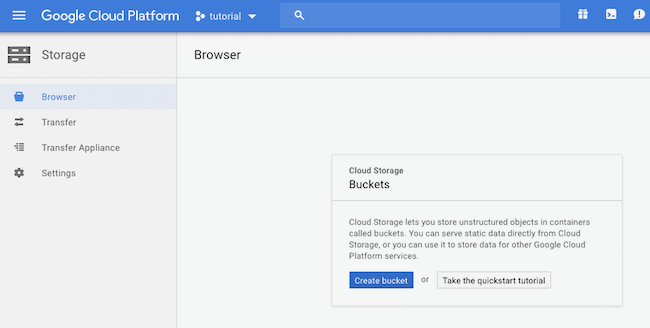
The biggest difficulty I found was finding an automated way to push the generated site folder to our GCE Instance. The solution was to set-up Google Cloud Storage. We create a storage bucket that we can easily push files to using CI; we mount the storage within the GCE virtual machine; and then we set-up nginx to use this bucket as the webroot and serve files from it.
Setting up a bucket is fairly straightforward. In the Storage area click on ‘Create Bucket’.

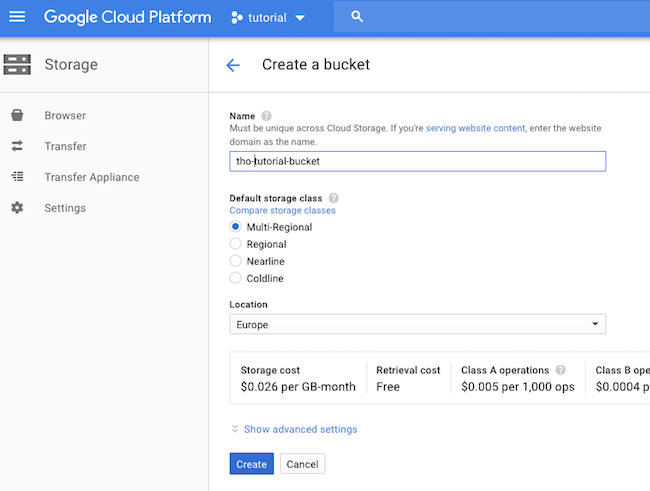
It needs to have a unique name (I’ve gone with ‘tho-tutorial-bucket’), stick with multi-regional, and I preferred to use European data centres.
Our VM Instance needs access via Cloud API access scopes to interact with the bucket so go to Compute Engine.
You’ll need to ‘Stop’ the VM before you can ‘Edit’ the settings.
Under ‘Access Scopes’ choose ‘Allow full access to all Cloud APIs’.
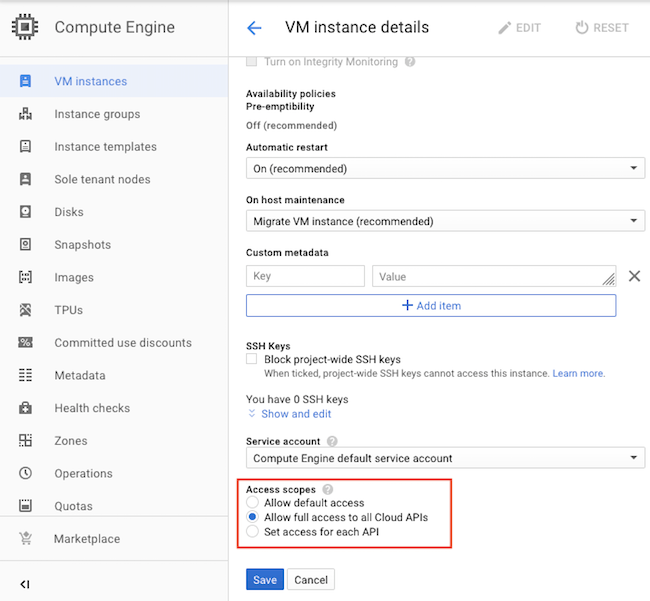
Save and restart the VM. Once it’s running start up the SSH Terminal again.
Mounting Google Cloud Storage Bucket in a GCE VM
To mount our storage bucket we need to install gfuse. The following commands add the correct source repositories, update them and then install gcsfuse:
$ export GCSFUSE_REPO=gcsfuse-`lsb_release -c -s`
$ echo "deb http://packages.cloud.google.com/apt $GCSFUSE_REPO main" | sudo tee /etc/apt/sources.list.d/gcsfuse.list
$ curl https://packages.cloud.google.com/apt/doc/apt-key.gpg | sudo apt-key add -
$ sudo apt-get update
$ sudo apt-get install gcsfuse
We also need a folder to mount to. Due to user permissions (and not wanting to use sudo as it can make mounting flakey) it seemed easiest to do this in the home directory so (where foo is whatever you want to call your folder):
$ cd ~/
$ mkdir foo
Before we mount there are a couple of things I learned the hard way. Nginx runs as user www-data. I couldn’t figure out any permissions situation that allowed nginx to access this bucket. The only option was to run gfuse with -o allow_other set which does have security implications (any user within our instance would have access to the contents of the bucket - I don’t however see this as a major problem for me here considering the simplicity of the server setup and the lack of sensitive data in the bucket).
The other flag that needs setting is --implicit-dirs so that subdirectories work as expected.
Go and run (where ‘tho-tutorial-bucket’ is the name of your bucket and ‘~/foo’ is the mount directory you just created):
$ gcsfuse -o allow_other --implicit-dirs tho-tutorial-bucket ~/foo
This should however fail as we need to edit /etc/fuse.conf and uncomment user_allow_other
Edit /etc/fuse.conf:
$ sudo nano /etc/fuse.conf
and remove the # from in front of user_allow_other. ctrl + x to save and quit.
Now try mounting again:
$ gcsfuse -o allow_other --implicit-dirs tho-tutorial-bucket ~/foo
This should now be successfully mounted.
Updating nginx Configuration
~/foo isn’t a practical folder for nginx to serve from though so we’re going to symlink this to somewhere more practical.
If you remember, our original nginx set-up looks for our site files in /var/www/html. We’re going to symlink to a new folder within /var/www/html. This also helps us as we may, in the future want to set up other site directories and host multiple sites using ‘virtual hosts’.
Run the following (changing foo for whatever suits you best and whatever you chose earlier):
$ sudo ln -s ~/foo /var/www/html/foo
We need to update our nginx configuration so that it looks in this new folder so edit /etc/nginx/sites-available/default again and change the webroot folder to /var/www/html/foo:
$ sudo nano /etc/nginx/sites-available/default
update this line:
root /var/www/html/foo;
ctrl + x to save and quit.
We need to restart nginx for the changes to take effect.
$ sudo service nginx restart
Automounting Cloud Storage Bucket
Currently, if we stop and start the VM Instance again, we’ll have to log in and manually mount our cloud storage again. This is far from ideal but we can set-up automounting by editing /etc/fstab.
$ sudo nano /etc/fstab
Add the following line at the bottom (we need the full path so you’ll need your username):
tho-tutorial-bucket /home/username/foo gcsfuse rw,allow_other,implicit_dirs
Right, there’s still nothing in this bucket for nginx to serve so we’re going to make a quick test file.
$ sudo nano ~/foo/index.html
We’ll just make another simple Hello World page (but different to our previous one so we know the new file is being served).
<h1>Hello Bucket World!</h1>
ctrl + x to save and quit.
Now stop the VM Instance. Next start it up again. Now, back in Tor Browser navigate to your onion domain (mine was arpf35uo2uscuxso.onion) and refresh the page. Fingers crossed we’re now seeing our new page which means everything is set-up correctly. Viola!
Just to note, there are now numerous options available for you to connect to this storage bucket and upload your website files. Personally I use cyberduck but your options are broad and wide.
Setting Up CI/CD
As previously mentioned, I’m going to base this next part of the tutorial upon the notion that you already have a Gitlab Pages Jekyll site. This is because it is my set-up.
I initially set this site up with Github before migrating to Gitlab. When I did move from Github to Gitlab the big thing I had to figure out is how to use Gitlab’s Continuous Integration to deploy to ‘pages’.
When I did figure it out (and I used scripts which I found online but didn’t document so I can’t share links), I had a .gitlab-ci.yml file that looked like this (if you don’t know what any of this means work through the tutorials):
# requiring the environment of Ruby 2.3.x
image: ruby:2.3

# add cache to 'vendor' for speeding up builds
cache:
  paths:
    - vendor/

before_script:
  - bundle install --path vendor

# add a job called 'test'
test:
  stage: test
  script:
    - bundle exec jekyll build -d test/
  artifacts:
    paths:
      - test # generating site folder to be browsed or download
  except:
    - master # the 'test' job will affect all branches expect 'master'

# the 'pages' job will deploy and build your site to the 'public' path
pages:
  stage: deploy
  script:
    - bundle exec jekyll build -d public
  artifacts:
    paths:
      - public
  only:
    - master # this job will affect only the 'master' branch
Basically this fires up a Ruby environment and builds the site into a folder called ‘public’ which is where gitlab pages serves it from. I’ve never actually used the ‘test’ option but ho-hum it’s there anyway.
The plan is then to expand this CI configuration file to also connect to our storage bucket and copy over the site files there so they are accessible by our Tor Hidden Service. Adding a few more commands was fairly straightforward.
Firstly we’re using dpl (which is a travis deployment package) which can be installed as a gem gem install dpl.
This can connect to numerous services. It can connect directly to a GCE VM Instance but not in the way that we need hence we’ve set up a storage bucket.
We’re going to need access keys though so, back in the cloud storage settings, in Storage > Settings > Interoperability you’ll find your ‘Access Key’ and ‘Secret’.
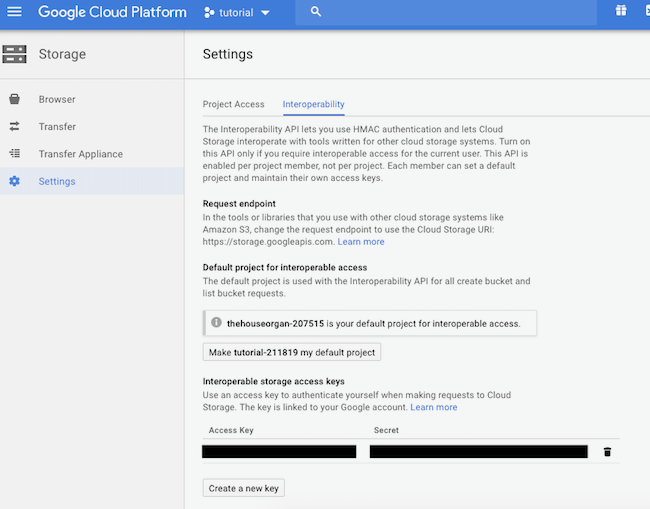
We need to be careful with these keys and keep them secret. We therefore can’t use them directly in our CI config otherwise anyone could see them by looking at our public code.
Rather, we’re going to use Gitlab’s CI variables (presuming you’re using Gitlab Pages like me). Within your Gitlab Project navigate to Settings > CI / CD.
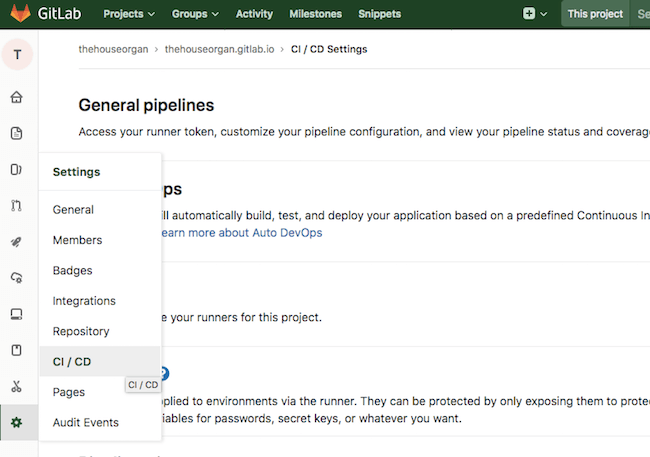
Then expand the section ‘Variables’.
We need to create 2 new variables called ACCESS_KEY_ID and SECRET_ACCESS_KEY_ID. Use the ‘Access Key’ and ‘Secret’ from earlier.
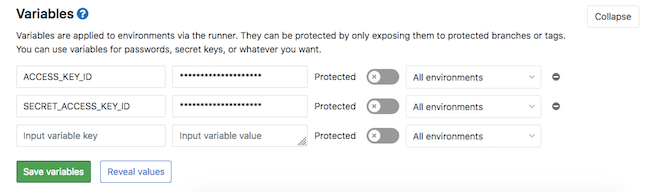
Now, when we add to our CI config we can reference these variables without revealing their values to the public.
To use dpl we string together the following:
- provider is gcs (google cloud storage)
- access-key-id is the $ACCESS_KEY_ID variable we set earlier
- secret-access-key is the $SECRET_ACCESS_KEY_ID variable
- bucket is tho-tutorial-bucket (or whatever you set previously)
- local-dir is the jekyll _site folder where the built site is stored. It’s important to use this folder (rather than try and use the public folder the CI runner has previously built to) as it’s part of the git project and dpl uses this (it’s primarily designed for pushing the whole git project I guess).
The entire string looks like:
dpl --provider=gcs --access-key-id=$ACCESS_KEY_ID --secret-access-key=$SECRET_ACCESS_KEY_ID --bucket=tho-tutorial-bucket --local-dir=_site
Edit the ‘pages’ section of your .gitlab-ci.yml like this:
pages:
  stage: deploy
  script:
    - bundle exec jekyll build -d public
    - gem install dpl
    - dpl --provider=gcs --access-key-id=$ACCESS_KEY_ID --secret-access-key=$SECRET_ACCESS_KEY_ID --bucket=tho-bucket --local-dir=_site
  artifacts:
    paths:
      - public
  only:
    - master
Now, whenever you commit a site change (i.e. a new post) it triggers the usual gitlab pages build process and puts your site into the ‘public’ folder and it also connects to your cloud storage bucket and puts your ‘_site’ directory there which is then served internally by nginx and proxied as a hidden service by Tor.
A note here though. You must make sure you have built or served the changes locally before committing/deploying so that the committed _site folder is up-to-date. This is usually fine if you’re working on changes on your computer and checking them in the local server before committing. If you don’t do this the _site folder won’t be updated with your changes. You can build within the CI runner but if the changes aren’t committed to git then they won’t upload to gcs and the hidden service site won’t reflect the changes on the gitlab pages site. I felt this was a small price considering I usually update the site this way anyway and I didn’t want to go into trying to figure it out any deeper.
Further Developments
I’ve pretty much managed to migrate the onion version of thehouseorgan.xyz from a home Raspberry Pi server to Google’s Cloud platform following the steps in this and the previous tutorial. The only things that are missing from this set-up are firstly that I need to set up ‘virtual hosts’ so I can serve more than one website this way. Secondly, I also had a torrent client set-up with all of the torrents of my music which I make available. This basically acts like an always on seed so I don’t have to leave my laptop running. I’ll need to try and set this up on GCE too.


![By Fir0002/Flagstaffotos [CC-BY-NC], via Wikimedia Commons](https://commons.wikimedia.org/wiki/File:Sunset_with_funnel_clouds.jpg)